|


Poser 4
Lecture 2 - Keyframe Animation
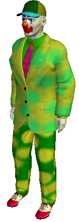
Clown Texture Mapping
1. Import the businessman figure.
2. Completely colour him white.
3. Go to the Render menu and select Materials.
4. Tick the box marked 'Texture changes apply to the entire figure'
5. Load Clown01.tif into the texture map section (This map is found here - H:jedmondsclown01.tif). Click OK
6. In the Document Display Style at the bottom left of the screen select the last sphere - 'Texture shaded'.
Clown Nose and Cap
1. Select Props from the right-hand side pop out menu. In the drop down menu select - Prop Types and create a ball.
2. Colour the ball red using the Colour tool in the Editing Tools Menu.
3. Scale the ball down (about 20% should be OK).
4. Position the ball into the correct position.
5. Make sure that the ball is selected, click in the Object menu and chose 'Change Parent'. As the character head is to have control over the ball, the Parent object will be the character's head. Select head and click OK.
6. Go back to step 1 of this section and repeat for the baseball cap (this is in the Clothing Props).
Clown Walk
1. Open the Bottom pop out menu (This is the animation menu).
2. Ensure that the frame slider is at 001 of 030 frames.
3. Press Ctrl - M keys to switch to the main camera if you are not already using it. Adjust the camera to a frontal view.
4. Change the 'Front - Back' sliders for the left and right Upper arms (Poser4 calls these shoulders) to read 35 degrees.
5. Select the abdomen and set the 'Side - Side' slider to read -3 degrees.
6. Select the chest and set the 'Side - Side' slider to read -3 degrees.
7. Change the camera view to 'From Left'.
8. Select and translate the left foot forward and the right foot back.
9. Drag the frame slider to 016 of 030 and go to the Figure menu, select Symmetry - Swap right and left.
10. Click Add Keyframe (this is the + on the animation menu). Now select the Edit Keyframe button (Small key icon to the right of the animation menu).
11. Click the empty gray box above the frame one keyframes. A white border appears around all of the frame one keyframes.
12. Hold down the left mouse button on the top gray square (frame one) whilst holding down SHIFT on the keyboard. Now drag the white bordered selection right to frame 30 (border goes blues). You have copied the first keyframe to the last frame. Close the Keyframe Editor (Top left of the window).
13. Go back to the Main camera view.
14. Now click on the play button in the animation menu to see how your hard work has paid off.
|
 |
|
|
|
|
|
|
|
|
|
|
|
|
|
|